How to Use GPT Image 2: Complete Guide to OpenAI's New Image Generation Model (2026)
Step-by-step instructions for generating your first image, writing prompts that actually work, editing without surprises, and knowing when to pick a different model instead.
This guide covers everything you need to start using GPT Image 2: picking the right access path, writing prompts that follow instructions reliably, editing images without unexpected changes, and avoiding the six mistakes that trip up most first-time users. Whether you're a designer, developer, or marketer, you'll find prompt templates you can copy and use today.
TL;DR
- → GPT Image 2 is best for instruction-following accuracy and readable short text — not for pure artistic beauty or the lowest cost per image.
- → Start with ChatGPT if you want the easiest path — open it, type your prompt, and generate. No setup required for paid subscribers.
- → Use the OpenAI API (model ID:
gpt-image-2) if you need product photo workflows, automation, or batch generation. - → Front-load your prompt — put the subject, style, and mood first. The model weighs earlier details more heavily; secondary elements can come after.
- → Put exact on-image text inside quotation marks in your prompt — without quotes, the model may paraphrase or abbreviate what you typed.
- → Add negative constraints at the end of your prompt —
no watermark, no border, no cartoon style— to remove unwanted defaults from commercial outputs. - → When editing, always specify what to change and what to keep — e.g., "change the background to a Tokyo street at night, keep the subject exactly as-is."
- → Do not rely on it for exact brand logo reproduction or multi-line body paragraphs inside images — these still need a design tool to finish.
What Is GPT Image 2?
In this guide, GPT Image 2 refers to a selectable third-party image generation model option built around three core strengths: following detailed instructions, rendering short readable text inside images, and making controlled edits without disrupting the rest of the image. FlowCanvas is an independent workspace and does not present this model as its own official product.
Under the hood, the model applies a reasoning step before generating: it appears to plan composition, check spatial relationships, and verify text accuracy before rendering the final image. The practical difference shows up the moment you try to generate a poster with readable text, a product shot with a legible label, or a UI mockup where button text matches what you typed. Those tasks consistently failed with older models. With GPT Image 2 they mostly just work.
Why it renders text better than older models
- →It appears to plan before drawing. Older models generated pixels without a global layout pass. GPT Image 2 seems to lay out the composition and place text regions first, then fill in detail — which is why text placement and object positions tend to be more intentional.
- →It follows layout and placement instructions more reliably. "Headline at the top, product centered, clean background" produces an output that actually matches — not an approximation of it.
- →It still struggles with long paragraphs and exact brand marks. In our testing, short text — headlines, labels, button copy — is dramatically more reliable. Multi-line body copy and precise logo shapes remain unreliable; those still need a design tool to finish.
The 5 Features Worth Your Attention
These are the capabilities that separate GPT Image 2 from earlier models. Everything else is incremental improvement.
1. Short text rendering
AI image models have struggled with on-image text since day one. Earlier OpenAI models often garbled letters on signs and labels in ways that made them unusable for real work. In our testing, GPT Image 2 handles short text — labels, headlines, UI copy — far more reliably than its predecessors, across Latin, Chinese, Japanese, Korean, and Hindi scripts. The single most important thing: wrap the exact words you want in quotation marks inside your prompt. If your workflow involves infographics, signage, product labels, or UI mockups, this improvement alone justifies the upgrade.
2. Controlled image editing
Generate an image, then refine it in plain language: "remove the shadow on the left," "change the jacket to dark green," "make the headline larger." The model preserves everything you didn't ask to change — which is harder than it sounds and something earlier models consistently fumbled. Add "keep everything else unchanged" at the end of each editing command to reinforce this.
3. Multi-reference image fusion
Upload two or more reference images and describe how to combine them. Useful for brand mascot campaigns, product-in-lifestyle scenes, app screenshot variations, and maintaining character consistency across a sequence of images.
4. Higher-resolution outputs
Native output goes up to 4096×4096 pixels — genuinely useful for print assets, packaging mockups, and hero images. One important note: large PNG files can be heavy. A single 4K PNG can reach 8–12 MB. For websites, compress images before uploading — an 80% quality JPEG or a modern web format like WebP can often preserve visual quality while reducing file size to under 400 KB.
5. Strong instruction following
Most image models treat your prompt as a rough suggestion. GPT Image 2 is built to follow it. Specify that an object should be in the bottom-left corner and it lands there. Describe a color palette precisely and the output matches. This makes it the most reliable choice for commercial workflows where the brief matters — brand color accuracy, layout specs, and design system compliance.
Honest Comparison: GPT Image 2 vs. The Rest
There's no single winner here. Each model has a lane. Here's how GPT Image 2 stacks up against the most-used alternatives right now:
| Model | Text Rendering | Photorealism | Speed | Editing | Best For |
|---|---|---|---|---|---|
| GPT Image 2 | ⭐⭐⭐⭐⭐ | ⭐⭐⭐⭐⭐ | ⭐⭐⭐⭐ | ⭐⭐⭐⭐⭐ | Accuracy-first work, editing, text |
| Midjourney V8 | ⭐⭐⭐ | ⭐⭐⭐⭐⭐ | ⭐⭐⭐⭐ | ⭐⭐ | Aesthetics, art direction |
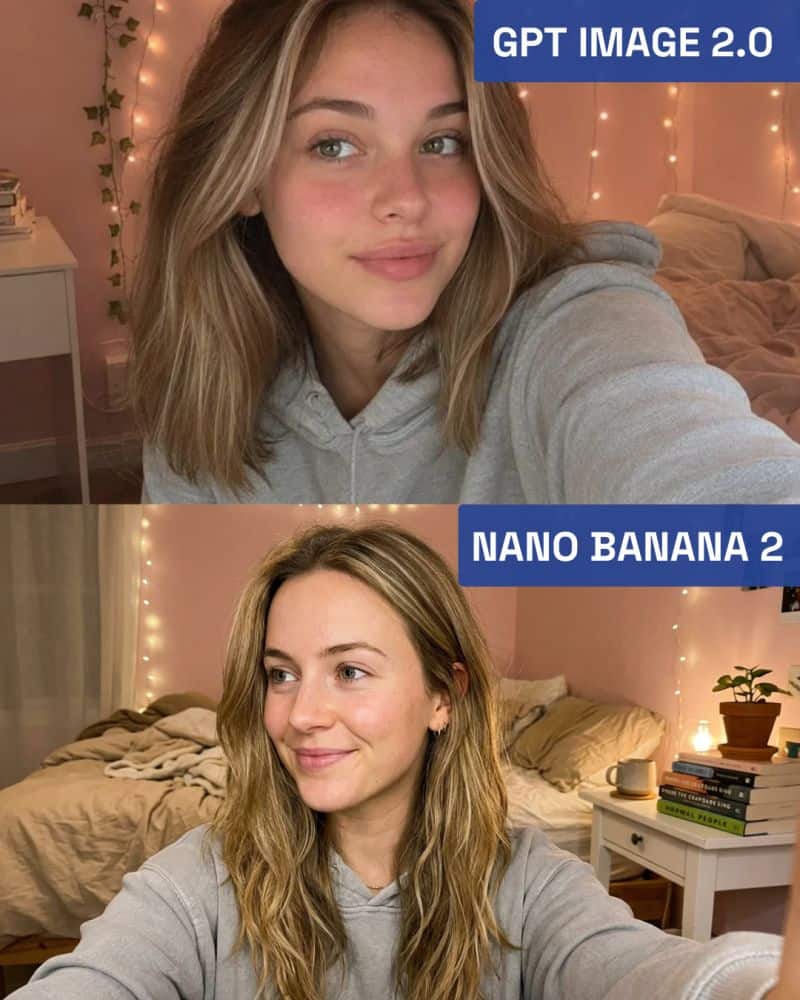
| Nano Banana 2 | ⭐⭐⭐⭐ | ⭐⭐⭐⭐ | ⭐⭐⭐⭐⭐ | ⭐⭐⭐ | Volume generation, rapid iteration |
| Flux 2 | ⭐⭐⭐ | ⭐⭐⭐⭐ | ⭐⭐⭐⭐⭐ | ⭐⭐⭐ | Open-source pipelines, API cost |
| GPT Image 1.5 | ⭐⭐⭐ | ⭐⭐⭐ | ⭐⭐⭐ | ⭐⭐⭐ | Legacy workflows (being retired) |
- →Choose GPT Image 2 when text accuracy, controlled editing, and instruction-following matter more than aesthetics or cost.
- →Choose Midjourney when artistic quality and atmosphere are the priority and on-image text is not required.
- →Choose Flux or open-source models when you need local deployment, open-source flexibility, or a self-hosted workflow without API dependency.
- →Choose a faster model like Nano Banana 2 when you need high volume at low cost and can accept a wider quality range.
Getting Started with GPT Image 2
There are three ways to access GPT Image 2. Pick the one that matches how you work.
Option 1 — ChatGPT (easiest path)
Best for: designers, marketers, and anyone who wants to generate images without writing code.
- 1Go to chatgpt.com and sign in to a paid plan (Plus, Team, or Enterprise).
- 2Start a new chat and type your image prompt — ChatGPT will route it to GPT Image 2 automatically.
- 3Download the result, or send a follow-up message to edit it in plain language.
- 4To increase resolution, ask: "Regenerate this at the highest available quality."
Free accounts may have limited access to image generation. Check your current plan for details.
Option 2 — OpenAI API (for developers)
Best for: building product photo pipelines, automating batch generation, or embedding image creation into your own app.
- 1Get an API key from platform.openai.com.
- 2Call the images endpoint with model: "gpt-image-2" in your request body.
- 3Set quality to "hd" for sharper outputs; use "standard" to reduce cost on high-volume runs.
- 4Handle responses asynchronously — the reasoning step adds latency compared to older models.
API pricing is pay-per-image and varies by resolution and quality setting. See openai.com/pricing for current rates.
Option 3 — No account needed
Best for: testing a prompt quickly, exploring the model before committing to a paid plan, or one-off image tasks.
- 1Go to https://gpt-images.org — no OpenAI account or subscription required.
- 2Type your prompt and generate. Results use the same underlying model.
- 3Copy the prompt templates from this article and paste them directly to test.
How to Write Prompts That Work
Most people write prompts like search queries. That's the wrong mental model. GPT Image 2 responds to directed descriptions — think art brief, not Google search. The more you specify, the less you get surprised.
The base formula
Front-load what matters most — the model gives more weight to details earlier in the prompt. Start with subject and style, add composition and lighting next, then any on-image text in quotation marks, and end with negative constraints like no watermark, no border.
Example: "A glass bottle of olive oil on white marble, product photography, centered composition, soft studio lighting from the left, label reading 'Cold Pressed' in clean sans-serif, no shadows, no watermark, 4K"
Text rendering: the one rule
GPT Image 2 treats quoted strings inside your prompt as verbatim copy targets — it renders them letter for letter. Without quotes, the model treats words as descriptive and may paraphrase, abbreviate, or skip them entirely.
✓ Good
"Clean app launch poster with the headline 'Scan Receipts in Seconds' at the top, bold sans-serif, white text on dark background"
✗ Bad
Create a poster about scanning receipts in seconds.
The model will invent its own headline copy.
- →Quote exact text — wrap every word that must appear verbatim in quotation marks inside your prompt.
- →Specify placement — "headline at the top," "label centered on the bottle," "caption in the bottom-left corner."
- →Keep it short — short labels, headlines, and button copy work reliably. More than two or three short lines still tends to produce errors.
- →Use post-editing for body copy — generate the image first, then add longer text as a layer in Figma, Canva, or Photoshop.
5 prompt templates you can use today
Copy a template, fill in the brackets, and run. Each follows the base formula: subject first, then style, composition, lighting, text, and constraints.
Product Shot
E-commerce images, lifestyle shots, hero imagesTip: Add on-image text after the composition: label reading "[exact text]" in [font style], centered on the product front.
App UI Mockup
Mobile app screens, dashboard wireframes, app store screenshotsTip: Name a specific design style (e.g. 'iOS Health app style' or 'dark Figma dashboard') for more authentic interface chrome.
Social Media Ad
Instagram posts, Facebook ads, Reels covers, LinkedIn bannersTip: State the aspect ratio explicitly: 1:1 for Instagram feed, 9:16 for Stories and Reels, 16:9 for LinkedIn and YouTube thumbnails.
Poster
Event flyers, product launches, campaign graphicsTip: Keep each text element under 10 words for reliable rendering. Use separate quoted strings for headline, subheadline, and any additional labels.
Character Reference Sheet
Game design, concept art, storyboarding, multi-image character consistencyTip: Save this sheet and use it as a reference image in multi-reference fusion to keep the character consistent across different scene prompts.

3 Prompt Rules Most People Miss
The base formula gets you started. These three habits separate consistent results from repeated re-runs.
1. Front-load what matters most
GPT Image 2 applies more weight to details that appear first in your prompt. If you lead with a style modifier like "beautiful, artistic, cinematic," the model may optimize for that aesthetic at the expense of your actual subject. Start with the subject and core style, then add supporting details — lighting, background, secondary objects — toward the end.
Recommended order
1st — Subject: "A bottle of skincare serum on a stone surface"
2nd — Style: "product photography, editorial quality"
3rd — Lighting & composition: "soft diffused light from above, subtle shadow"
4th — On-image text: label reading "Hydra Boost" in minimal sans-serif
5th — Constraints: "no watermark, no border, 4K"
2. Use negative constraints to clean up output
Adding exclusions at the end of your prompt prevents the model from filling in defaults you didn't ask for. This is especially useful for commercial and e-commerce work where clean, uncluttered outputs matter.
Place all negative constraints as the final clause of your prompt, after resolution or output format. Example: ...4K, no watermark, no border, no extra text
3. Write a creative brief, not a keyword list
Keyword-style prompts are a holdover from older models that processed prompts as bags of tokens. GPT Image 2's reasoning layer responds better to sentences that carry context — it can infer spatial relationships, lighting logic, and compositional intent from natural language.
✗ Keyword list
woman, studio, dramatic lighting, 8K, masterpiece, cinematic
✓ Creative brief
A portrait of a woman in her late thirties, single softbox from camera-left, clean gray backdrop, expression relaxed and slightly amused, editorial magazine style
Before / After: Image Editing in Practice
The multi-turn editing workflow is where GPT Image 2 separates itself most clearly from the pack. Here's how a real session looks:
- 1Generate a base image with your full prompt.
- 2Send a follow-up: "Change the background to a busy Tokyo street at night." The subject stays intact.
- 3Refine further: "Add rain reflections on the street and make the neon signs read 'OPEN 24H'."
- 4Export at 4K when the shot looks right.
Editing command templates
Every effective editing command follows the same principle: say exactly what to change, then say what must stay unchanged. Use "Keep everything else unchanged." as a default closer on every command.
| Edit type | Copyable command |
|---|---|
| Change color | Change the jacket from navy to burnt orange. Keep the pose, face, and background unchanged. |
| Replace background | Replace the white studio background with a warm marble showroom interior. Maintain all foreground elements, subject position, and lighting direction. Keep everything else unchanged. |
| Add object | Add a steaming coffee cup on the desk in the bottom-left corner. Match the existing lighting temperature and angle. Keep everything else unchanged. |
| Remove object | Remove the umbrella in the background. Fill the area naturally with the surrounding wall texture. Keep everything else unchanged. |
| Change text | Change the label text from "Summer Edition" to "Limited Edition 2026". Keep the same font, size, position, and color. Keep everything else unchanged. |
| Adjust lighting | Make the lighting warmer and add a soft golden hour glow from the right side. Keep the subject, background, and composition unchanged. |
Multi-reference image fusion
Multi-reference fusion lets you combine elements from separate images in a single generation. Use it whenever you need a character, product, or visual element to appear consistently across different scenes or backgrounds.
- 1Upload reference A — your character, product, or brand element.
- 2Upload reference B — your target background, scene, or style.
- 3Write a prompt that describes how to combine them: "Place the character from the first image into the setting from the second image. Keep the original character design exactly as-is. Keep everything else unchanged."
- 4Use the output as the next reference image to maintain consistency across additional scenes.
Works well for: brand mascot campaigns, product-in-lifestyle scenes, app screenshot variations, and consistent characters across a story or content series. Character consistency is noticeably better than in older models — not perfect, but reliable enough for most commercial use cases.

Where It Still Falls Short
No model guide should end with a standing ovation. Here's where GPT Image 2 still gives you problems:
Complex anatomy under stress
Hands, fingers, and feet in unusual poses still cause occasional errors. The model is better than predecessors — dramatically so — but not solved. For close-up hand shots, generate 3–5 variants and pick the best one.
Crowded scene composition
Ask for a busy street with 20 distinct characters and the model starts cutting corners: duplicated faces, blurred background people, spatial inconsistencies. Keep scene complexity moderate or use multi-turn to build up the scene in layers.
Content policy edge cases
The policy is stricter than competitors in some areas — certain stylized violence, political figures, and brand logos trigger refusals that feel inconsistent. If a prompt gets rejected, rephrase before assuming it's a hard block.
Cost at scale
API pricing varies by resolution and quality setting — see openai.com/pricing for current rates. At typical API rates, running 500+ images a day adds up quickly. For high-volume pipelines where quality tolerance is higher, Nano Banana 2 or Flux 2 will deliver a better cost-per-image ratio.
Brand logo reproduction
The model cannot reliably reproduce exact logo shapes, proprietary typefaces, or precise vector geometry. Generate the scene around the logo placement, then composite your actual logo file in Photoshop or Figma. Trying to prompt your way to a pixel-perfect brand mark will consistently disappoint.
Long-form text in images
Short labels, headlines, and button copy work well. Multi-line body paragraphs — anything beyond two or three short lines — still produce errors. For text-heavy layouts, generate the image and add body copy as a separate layer in your design tool.
Common Mistakes to Avoid
Most GPT Image 2 problems trace back to one of these six errors. Fix them and your output quality improves immediately.
Writing prompts like search keywords
"Beautiful sunset photo, 8K, masterpiece" gives the model almost nothing to work with. Write a creative brief instead: describe the subject, the lighting, the mood, the composition, and the intended use. The more specific you are, the fewer re-runs you need.
Forgetting quotation marks around on-image text
If you want a poster with the headline "Summer Sale 2026", write it exactly like that — in quotes — inside your prompt. Without quotes, the model treats the words as descriptive and may paraphrase, abbreviate, or skip them entirely.
Asking for too many unrelated goals in one prompt
Stacking five different objectives — product shot, lifestyle scene, text overlay, specific brand colors, and unusual angle — causes the model to make trade-offs you didn't choose. When in doubt, split complex requests into two separate generations and combine in post.
Editing without specifying what stays unchanged
"Change the background to a Tokyo street" can cause the model to regenerate the whole image, including the subject you wanted to keep. Always add what should stay: "change the background to a Tokyo street at night, keep the subject and lighting exactly as-is."
Expecting exact brand logo reproduction
GPT Image 2 cannot reliably reproduce proprietary typefaces, exact vector shapes, or specific brand marks. Generate the scene around the logo placement, then composite your actual logo file in Photoshop, Figma, or Canva. Prompting for a perfect logo will consistently disappoint.
Publishing 4K PNGs without compressing first
A single 4K PNG from GPT Image 2 can be 8–12 MB. Uploading it directly to a web page will hurt your Core Web Vitals and page load speed. Compress to ~80% quality JPEG first — the visual difference is near-zero and the file drops under 400 KB.
Frequently Asked Questions
- What is GPT Image 2?
- GPT Image 2 is discussed here as a selectable third-party image generation model option. It applies a reasoning step before generating — planning composition, verifying text accuracy, and checking that all prompt conditions are met. This makes it significantly more reliable for instruction-following tasks like product shots, posters, UI mockups, and images with readable text.
- How do I use GPT Image 2?
- The simplest path is ChatGPT (paid plans) — open a chat and type your prompt. For automation or code-based workflows, use the OpenAI API with model ID gpt-image-2. If you want to test without an account, try https://gpt-images.org. In all cases, write descriptive prompts that specify subject, style, lighting, and composition.
- Is GPT Image 2 free?
- Free ChatGPT accounts may have limited access to image generation features. Heavy users typically need a paid plan or direct API access, which is billed per image. You can test GPT Image 2 at https://gpt-images.org with no account or subscription — a good option if you want to try a few prompts before committing.
- What is the best prompt format for GPT Image 2?
- Use this structure: Subject + Style + Lighting + Composition + Output format. Put the most critical elements first — the model gives more weight to earlier details. For any text you want to appear in the image, put it in quotation marks. End with negative constraints if needed: no watermark, no border, no text overlay.
- Can GPT Image 2 generate readable text inside images?
- Yes — this is its strongest differentiator from older image models. In our testing, short text like headlines, labels, and UI copy is far more reliable than in previous versions. The one rule: always wrap the exact words in quotation marks inside your prompt. Multi-line body paragraphs are still less reliable and should be added as a design layer post-generation.
- Can GPT Image 2 edit existing images?
- Yes. Upload an image and describe what you want to change — the model applies targeted edits while preserving the rest. Always specify what should stay unchanged: "change the jacket color to dark green, keep everything else exactly as-is." Without that instruction, the model may regenerate more of the image than you intended.
- How do I keep the same character consistent across multiple images?
- Use multi-reference image fusion: upload a reference image of the character alongside your new scene prompt, and instruct the model to keep the character design exactly as shown. Consistency has improved meaningfully compared to earlier models — for complex characters, generating a few variants and selecting the best one is still a practical workflow.
- Why did my prompt get rejected?
- OpenAI's content policy blocks content including certain depictions of real people, graphic violence, and some brand identity elements. If a prompt is declined, try rephrasing before assuming it's a permanent block — many refusals are triggered by specific word choices rather than the underlying concept. Rephrase the description and try again.
The Bottom Line
GPT Image 2 is the strongest available model when you need the image to follow your instructions precisely — readable text on signs and labels, multi-element compositions that match the brief, and editing that doesn't rewrite parts you wanted to keep. It's not the right pick if pure artistic beauty is the goal, or if you need to generate hundreds of images a day at minimum cost.
The best way to calibrate whether it fits your workflow is to test one prompt. Copy the product shot or poster template from the prompts section above, fill in your subject, and run it. Most users know within two or three tries whether this is the right tool for their work.
Test a prompt right now — no account needed.
Copy any template from this guide and run it directly in your browser.
Try GPT Image 2 Free →